|
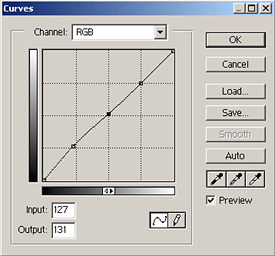
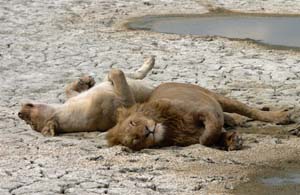
Advanced Photoshop Techniques for Photography - Part 2 All photographs copyright Jay Torborg. Adjusting Curves The next thing you might want to do is adjust the contrast and/or bring up some of the shadow detail. I usually find that Curve command is the easiest way to do this, but there are other tools that can be used as well. In this case, the curve adjustment will be subtle.
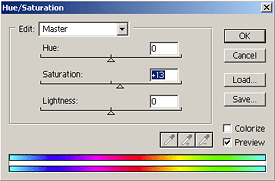
I've increased the level in the shadows to bring out some of the shadow detail in the male lions ruff, but left the rest of the tonal range alone. Selective Changes This image is still a little too monochrome, so I'd like to bring out some more of the color. Some areas of the image can use more color than others, so I'm going to create too copies of the image, adjust the saturation differently, then blend them together. The easiest way to do this is with layers. Unfortunately, Photoshop 6 only handles layers in 8-bit per pixel mode, so we'll first have to convert. Use the View -> Mode menu to do this, or see Digital Camera Noise Reduction below. To create a second layer, go to the Layer menu and select Duplicate Layer. You can change the name if this makes it easier for you to remember which layer is which. With the top layer selected, I adjusted the saturation +13. This seemed about right for the lions, but was not as high as I wanted for the water puddles or the dried mud.
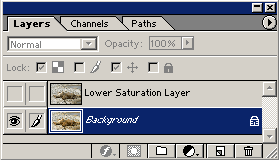
I then switched to the bottom layer by selecting it in the Layers window as shown below. I also turned off visibility for the top layer by clicking on the eye symbol associated with the top layer.
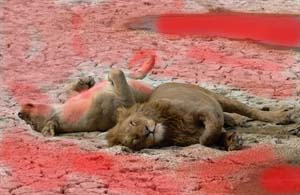
For this layer, I cranked the saturation up quite high by specifying +50. This obviously makes the lions way over saturated, but the water puddles now show some nice blue sky and the dried mud is a little richer in color.
could see the more saturated background layer. I also did a little erasing on the dried mud and the female lioness. The results are shown in the final version of the image in Part 3 of this tutorial. This technique can be used any time you need to selectively perform an operation only on part of the image. For example, if you wanted to sharpen the foreground, but blur the background, you could apply unsharp mask on the top layer and gaussian blur on the bottom layer, then erase the the areas on the top layer that you wanted blurrier. I also use this technique for situations where I should have used a split neutral density filter but was unable to (or didn't realize I should have). It's not as good as getting the correct exposure in the first place, but you may be able to salvage an image that would have otherwise been too contrasty. Remember to use a soft brush at a relatively low opacity so that you can nicely blend between the layers. Once you're done, the layers can be merged back together. Digital Camera Noise Reduction Digital camera image sensors are susceptible to noise (mostly thermal noise) which can detract from the image, particularly in areas of low image detail. The noise is more pronounced at higher ISO settings, just as high speed film has more pronounced grain. Much of this noise can be reduced or eliminated with relatively minor affect on the image detail and sharpness. Fred Miranda has created a set of Photoshop actions designed to reduce noise for a number of specific cameras. Since each camera's noise characteristics are a little different, different actions are required. I use the actions designed for my Nikon D1X camera and have been very impressed. The noise reduction actions are designed to be run in 16-bit mode after all 16-bit tonal changes have been made. At the end of the action, your image will have been converted to 8-bit mode. |