July 2001

July 4 - We left for Fallbrook, CA around 7:00 AM on the morning of the 1st. Our plan was to arrive in Fallbrook by the evening of the 2nd, and we wanted to stop at the "Butcher of Bagdad's" house to see his JBL build in progress on the way. Andy lives a couple hours north of Fallbrook. The drive from our home to Fallbrook is about 1300 miles, so we had our work cut out for us. 

We actually made great time and arrived at Andy's house at noon on Monday the 2nd. We spent a couple hours chatting and taking lots of detail shots of Andy's car (I forgot to take any overall shots, so the one to the right is one of Andy's), then went over to Andy's machinist friend's shop to talk to him about making a few parts for us.


Andy has a great website with lots of amusing stories about his build. He's made great progress on his car and is pretty close to completion now. We've learned a great deal from his mistakes and successes and I'm sure we'll save a lot of time as a result. Andy has also been extremely gracious in answering all our questions. Thanks Andy!


I had last talked to Dave at JBL about three weeks ago to tell him we wanted to arrive on the 3rd. When I talked to him, he said they were still reasonably on schedule, but he wasn't sure if they'd be completely ready. I think he'd forgotten we were coming since he was a bit surprised when I called him from Andy's letting him know we were almost there. "Why don't you stop at Knott's Berry Farm for a couple days on your way here" 

was his reply. We weren't surprised that they were behind schedule, but figured that we'd get the car sooner if we just showed up. 

We had ordered a "stage 2" kit which was supposed to be partially assembled - suspension, brake, fuel lines, rear-end, radiator, etc. - and have the body installed and primed. We had already decided to take the car without the body installed since we felt it would be easier to do the wiring and drive-train install without the body in place. 


When we arrived on Tuesday, the brake lines and fire suppression system was plumbed and the differential and steering rack were installed, but that was about it. In order to get the car on the trailer to take it home, we'd need to, at a minimum, install the suspension, mount the wheels and tires, and temporarily mount the body. 

Richard (JBL's chief engineer) had recently made some design changes to the front suspension. The new parts (uprights, rockers, and steering arms) are made from CNC machined billet aluminum and look gorgeous, but the uprights and rockers were not done when we arrived. By the end of the day Tuesday, the uprights were done, but the rockers would take a couple more days of machining. So we figured out a way to temporarily use the old rockers to get the front suspension put together enough to bring the car home. We'll get the new parts shipped up to us next week.

We spent all day Tuesday working with JBL's folks to get the car ready to go - mounting the radiator brackets and radiator, fuel pump, steering column and starting work on the suspension. We ran into a couple problems which required some machining work but 

   these were quickly solved. We finally called it quits for the day at around 9:00 PM.

Richard, Dave, and one of the other JBL technicians agreed to work on the 4th to get us on our way - thanks guys! By 3:30 in the afternoon, we finally had the suspension assembled, the steering column in place with a borrowed steering wheel, and the wheels mounted. 

We rented an "Auto Transport" trailer from U-Haul to bring the car back home. The trailer worked out great - even with the super wide tires (335's in the back), the car fit

fine. We loaded up all the ancillary components - windshield, headers, side pipes, doors, trim panels, interior upholstery, door beams, etc. - inside the car with very little room to spare. The hood and trunk lids were taped in place with duct tape and a few other fiberglass parts (hood liner, trunk liner) were tucked into the interior. We were finally on our way at 4:30 in the afternoon.  

July 8 - We made it home at around noon on Friday (July 6). The only significant problem we had was with our car air-conditioning. For some reason, the climate control fuse was blowing after 10-15 minutes. After changing it a couple times, we gave up and lived with the heat. It was 110 degrees and 80% humidity in central CA, which was not fun, but once we got to Oregon the weather was very pleasant.

We've spent a little time laying out the wiring harness and ordering parts to mount the 

   fuse box and harness, but we spent most of the weekend at the Northwest Vintage Auto Races at Seattle International Raceway. On Saturday, there were about a dozen Club Cobra members with their replicas. Bish Wheeler was nice enough to let me ride with him in his car on a couple parade laps. Thanks Bish! Looks like a great track - can't wait until our car is ready to take over there on lapping days.

July 15 - We've been so busy working on the car that we haven't had a chance to post to our journal. Our first week with our "kit" has been exciting, interesting, and just a bit frustrating. Looking back on the week, we accomplished quite a bit, but it seemed like every time we started to do something, we'd run into a problem where we had to run down to the local hardware store or order a part from the web. If we couldn't get the part 

 
locally, we'd go on to something else until we hit another road block. I think we placed at least a dozen internet orders this week, and the UPS driver is getting to know us really well. Fortunately, he seems genuinely interested in our car project and has been happy to schlep all the boxes into our garage so he can get another look at the progress.

Our first challenge was to figure out where we were going to put everything that we needed to attach to the car. The list includes the fuse box, engine computer, MAP manifold, radar detector sensors, horns, stereo head unit, stereo amplifier, accusump (more on this in a bit), remote oil filter, oil "puke tank", fuel filters, and coolant overflow tank. We have more-or-less figured out most of these, but we need to wait until we get the radiator fan and the brackets for the anti-roll bar linear actuators before we can tell if everything will fit.

We received our computer on Monday and discovered that it was just a little too big to fit on the chassis panel we had selected. Instead of moving it, I designed a custom bracket that we're having fabricated by our machinist. It's currently temporarily installed with two bolts until we get the new bracket. 

We also found that bracket that was supposed to be designed for a 351W to hold the crank trigger sensor did not fit our timing cover. So, another drawing to our machinist for a custom bracket.


We had thought that the computer came with a fuel injector wiring harness, but this was not the case. We had to order individual fuel injector plugs and make our own harness. The plugs arrived on Thursday and Scott was able to get them all wired up and installed so our induction system is now fully assembled.

The first major task to putting the car together is installing the wiring harness and routing the fuel lines (since the brake lines and fire suppression system had already been installed before we brought the chassis home from JBL). The wiring harness that came with the JBL is fairly complete, but we still needed additional wiring for the stereo, radar detector, extra gauges, accusump, and linear actuators. For anyone planning to

build a car - if you want to save time and frustration up front, make sure you have a selection of fasteners and wiring accessories on hand before you start.

When we were at the Vintage races at SIR last weekend, we met a few people that had Accusump systems in their cars. This is a pressurized oil canister that connects to your oil system. It serves two purposes - it maintains oil pressure in case the oil sloshes away from the pickup in high-G turns, and it allows oil to be flowed through the engine before you start it. We're installing a 2 qt system which is the recommended size for our engine. This is a cost- effective and space efficient alternative to a dry-sump system for limited race use.

The other time consuming task for this week was working on the fuel and oil lines. We are using Earl's Performa-flex hoses and Swivel-Seal fittings. There are a lot more hoses and fittings required than you might first imagine. The hoses take a bit of time to assemble, but they're not as hard or frustrating as I'd been led to believe.

July 22 - It seems like it's taking forever, but we're finally making some serious progress on the wiring. We've finished all the wiring to the rear of the car, which includes the rear lights, battery, stereo, fuel sender, radar detector, and linear actuator for the rear anti-roll bars.

We decided to mount the stereo head unit in the back of


the car between the seats (we still have to make the mounting bracket). It will be accessible  from the passenger compartment, but will normally be covered by an access panel. We're going to mount an IR repeater under the dash so that the stereo can be controlled with an IR remote control (whose home normally be in a door pocket).


We also finished routing the fuel lines from the fuel cell to the front of the car. There are three lines - one from the fuel cell to the fuel rails, via two fuel filters and the fuel pump; a return line from the fuel pressure regulator back to the fuel cell; and a vent line so that the fuel cell can be vented into the engine air filter so that fumes are pulled back into the engine.

The positive battery cable is routed through a battery cutoff switch. The negative battery cable is grounded to the chassis near the back of the car. To reduce the number of times we have to expose the bare chassis through the powder-coat, we've also run additional ground lines from the chassis grounding point to terminal blocks in the engine bay. These will be used for the ground wires required for devices in the front of the car.


We also installed an Aeromotive fuel pump controller. This device replaces the fuel pump relay and controls the voltage to the fuel pump based on the engine load. This reduces the amount of fuel that must flow through the fuel system and back into the tank when the engine is lightly loaded. It also includes an override control which is connected to the "FUEL" switch on the dash.

The radiator fan came during the week so we also got that installed. We also installed the horns. 

We're hoping that the new front suspension components will come from JBL this week so that we can get these installed. While we have the suspension taking apart, we can finish routing and securing the wires up front.


The steering column comes in bare steel, so it needs to be painted or it will rust. We put on a couple coats of primer and a few coats or Rustoleum flat black, but it needs a couple more 
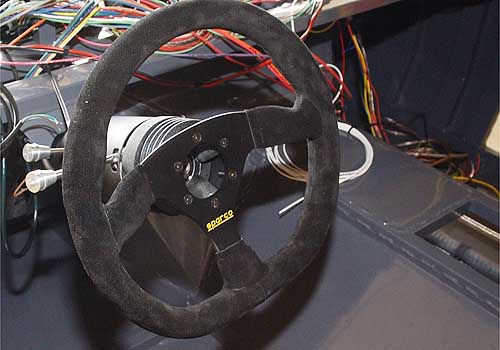
coats before we can reinstall it. We also picked up the hub adapter for our Sparco wheel, so that can be mounted as soon as the column is back in.

Tomorrow (Sunday), we hope to get the bracket made for the stereo head unit, and start working on the gauge wiring.

July 31 - I'm falling behind on updating this site. We didn't spend as much time on the car this past week since we had other things to do, and spent the weekend visiting friends in the San Juan Islands. Many of the local Cobra owners got together for a BBQ and drive and it sounds like they had a great time. We're sorry we had to miss it, even though we don't yet have a Cobra to drive.

We decided to get Jorge to make the brackets for the stereo head unit for us, so we sent him some drawings instead of trying to fabricate them ourselves.

We dropped the headers and sidepipes off at a local welder to get small clips welded on to fasten the sidepipes to the headers. We decided to use the same approach that fellow-JBL- builder Andy is using - clips welded to each pipe with springs across the joint. We'll post a photo as soon as we can. We also had a 
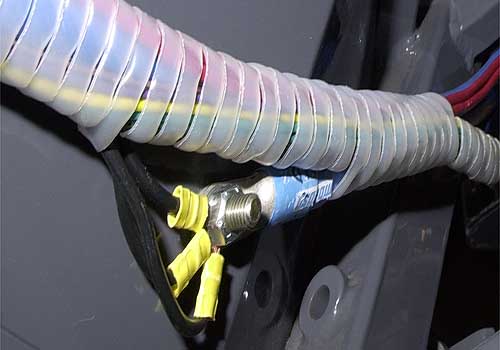
fitting for the HEGO sensor welded into one of the collectors.

The welding was done in a couple days, so we picked up the pipes and headers and drove them down to Performance Coatings in Auburn to have them ceramic coated 

with CermaChrome. This is a high temperature coating that looks similar to chrome plating, but stands up to the heat much better.

We also tracked down the alignment dowels needed for the clutch and, thanks to Andy, found a source for a clutch alignment tool. So we're just about ready to install the clutch and transmission so that we can install the engine.


Scott spent some time wiring up the gauges and doing a little more wiring in the front of the car. I finished painting the steering column and we got that re-installed with the new steering wheel.

I've also expanded the links section - adding a few more links to sources for parts and tools.

Next Month - Install the engine, start on the dash.