May 2001

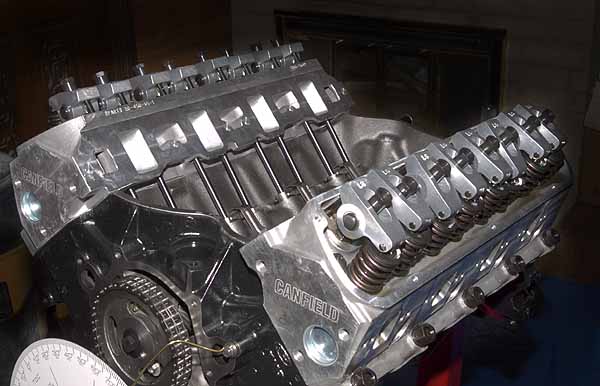
May 5 - We finally got a chance to do some serious work on the engine. The cylinder heads, intake system, and camshaft all arrived yesterday. We started by installing the camshaft. After lubricating the lobes with cam lube and the journals with 30 weight, the camshaft slid right in with little trouble.

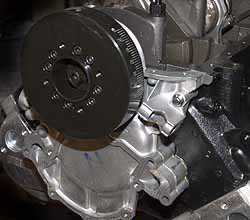
The crankshaft timing sprocket was another story. The keys on the crank were a little too large for the keyhole in the sprocket, so the sprocket was a tight fit, to say the least. One of our books said that some light tapping with a rubber mallet might be necessary, so we started out this way. We soon got to the point that we were committed - the sprocket was not coming back off, but neither was it going on. We got out the Dremel tool and tried to grind down the keys behind the sprocket a little, to limited success. After more "tapping" with the hammer, we did finally get the sprocket on, but I later learned that doing this too hard can damage the main bearings. Fortunately, there is still no play in the camshaft, so we're pretty confident that the thrust bearing is still fine.

Before we had the sprocket all the way on, we slid on the timing chain. We thought we had the sprockets lined up, but after turning the crank a couple times, we realized that we were off by one sprocket. We did manage to get it back off and on the right way, but it's a lot easier to get it right before the sprockets are almost all the way on.

Next we decided to check the fit of the cylinder heads and the valve geometry, and degree the cam. The cylinder heads fit like a champ, and we put started to put the valve train together for cylinder one, only to realize that we did not have the rocker studs. We placed an order for these and will have to wait until next weekend to finish this up.

May 7-9 - In 1999, my wife and I signed up for a three day road racing course taught by Pitarresi Pro Drive at Portland International Raceway. We had to cancel on this class due to illness, and scheduling conflicts prevented us from taking this course last year. When this seasons schedule was announced, we made a point of blocking off these three days so we could take the class.     
My wife was very nervous before the class, but left feeling much more confident about her driving. I thought it was a total blast and also learned a lot about high performance driving and controlling a car at speed. Click here to learn more about this class. This kind of class is a good idea for anyone that drives a car, but if you're going to drive a car like a Cobra, it's almost essential.

May 10 - Scott has continued to work on new dash designs. He talked me into doing a dash with leather and aluminum and came up with a few more proposals. The design below is mostly his concept. We found an on-line leather company that sells dyed hides of heavy leather for about $150. We ordered one to see how it looked, and it was a fairly close match to our seats, so we've ordered another to do the door panels.

Click on the photo above to get a higher resolution view. This is a large image, so will take a while to download on a slow link.

We stuck with the general layout of the gauges, but changed a couple switches. We added a switch to turn on the fuel pump and ignition, and removed one of the accessory switches. We also moved the K-40 LEDs to a cluster of LEDs in the center that includes the directional indicators and a check engine LED in the center.

May 13 - A good day on the engine. We degreed the cam, checked the valve clearances, installed the heads and valve train. Finally, some significant progress.

Click here to see some of the steps to get to this point. Everything went very smoothly with no glitches.

We're still waiting for the oil pan to be returned from Armando - when this

  
arrives, we'll be able to finish the bottom of the engine. Our next step is to install the timing cover, water pump and balancer. To get the balancer on, we're going to have to grind down the crankshaft keys a bit so the balancer will slide on more easily.

May 30 - We haven't made much progress in the past two weeks. I took a week off to go mountain biking in the Canyonlands National Park near Moab UT (great experience). Last weekend, Scott and I went to Indianapolis to attend the Indy 500 - a first time for either of us. This was an interesting experience, but I probably won't do it again - you can only see about a quarter of the track from any one location, so we spent a fair amount of time just watching the monitors. If you really want to watch the racing, you're better off watching it on TV.

I spent a while trying to figure out where to get an oil slinger for the engine. A few of the engine build books I have mention this part (slips on the crankshaft before the timing cover and dampener are installed), but I couldn't find one in any of the on-line auto parts sites or my local auto parts dealer. Turns out that this part was only used on pre-1978 engines since the seal technology has improved to the point that it is no longer necessary. This held us up for a bit though, since we didn't want to install the dampener if we were going to have to take it back off.

I also ordered a dampener installation tool to make the job of installation (and possible removal) easier. This finally came early this week. Scott and I are hoping to make significant progress on the engine over the next several days.

We also ordered the Electromotive TEC-II fuel injection and ignition system. We plan to run this closed loop up to about 1/3rd throttle using an exhaust gas oxygen sensor. Above 1/3rd throttle, it will use RPM and throttle position to control fuel flow and ignition.

May 31 - We made some good progress today. We got the timing cover, water pump, and dampener installed on the engine. The dampener installation tool we purchased from Jeg's really helped. Click here to see more details.

We only ran into one problem - the ARP fastener set we had bought didn't have all the bolts needed for the timing cover and water pump so we had to dip into our assorted grade 8 bolt set we had purchased from www.nutty.com

  
We also found that one of the bolts (the longest one that goes through the water pump and timing cover into the block) is a little too long. I assume that this is because it normally goes through the power steering pump bracket as well (which we're not using). At any rate, we'll have to get a shorter bolt for this location.

Next Month - Hopefully, we'll have the engine ready to install in the chassis.